防 AI 网页爬虫工具 Anubis 安装配置中文文档
该程序旨在帮助保护小型互联网免受人工智能公司无休止的请求风暴的影响。Anubis 尽可能轻便,以确保每个人都有能力保护离自己最近的社区。

Anubis是一款网络人工智能防火墙实用程序,它利用一个或多个工作量证明任务权衡你的连接灵魂,以保护上游资源免受网络爬虫机器人的侵害。
该程序旨在帮助保护小型互联网免受人工智能公司无休止的请求风暴的侵袭。Anubis尽可能轻量级,以确保每个人都有能力保护离自己最近的社区。
Anubis有点像核反应堆。这将导致你的网站被较小的网络爬虫阻挡,并可能抑制像互联网档案馆这样的 “好机器人”。您可以配置机器人策略定义,明确允许列出这些机器人,我们正在开发一套 “已知良好 ”机器人,以便在可发现性和正常运行时间之间达成折中。
在大多数情况下,您应该不需要这样做,或许可以使用 Cloudflare 来保护指定的来源。但是,如果您不能或不愿使用 Cloudflare,Anubis 就能满足您的需求。
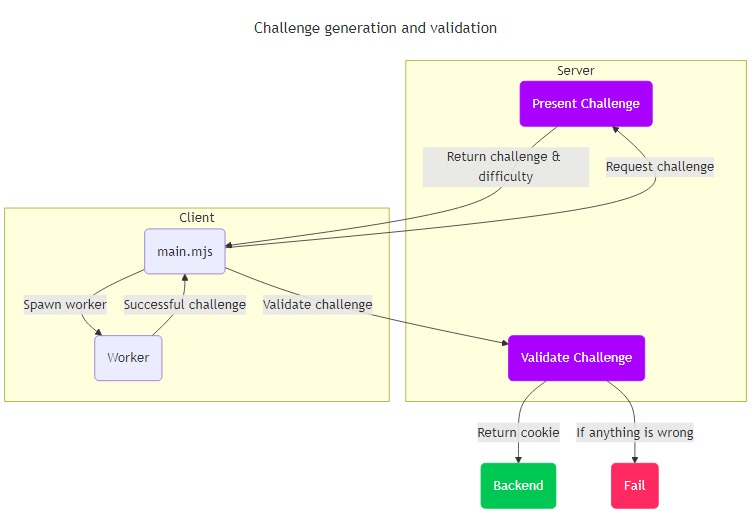
Anubis 如何工作
Anubis 使用工作证明挑战来确保客户端使用的是现代浏览器,并且能够计算 SHA-256 校验和。Anubis 可自定义工作量证明挑战的难度,但默认为 5 个前导零。
工作量演示
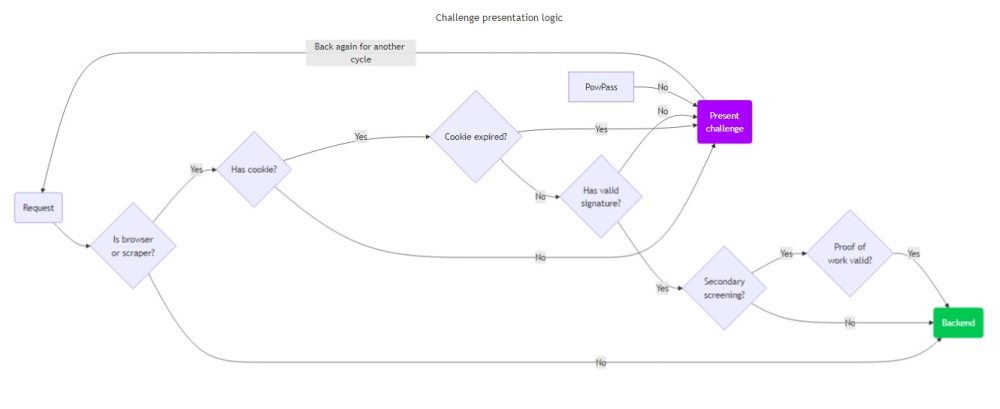
Anubis 使用以下逻辑决定提出工作量:
- 用户代理包含 “Mozilla”。
- 请求路径不在
/.well-known、/robots.txt或/favicon.ico中 - 请求路径显然不是 RSS 源(以
.rss、.xml或.atom结尾)
这应能确保 git 客户端、RSS 阅读器和其他危害较小的客户端可以顺利通过,但浏览器和人工智能网络爬虫机器人等高风险客户端将被阻止。
通过工作量挑战的证明
当客户端通过工作量挑战时,Anubis 会设置一个名为 “techaro.lol-anubis-auth” 的 HTTP cookie,其中包含一个已签名的 JWT(JSON 网络令牌)。该 JWT 包含以下声明:
challenge: 从用户请求元数据导出的挑战字符串nonce: 用于生成传递响应的 nonce/迭代号response: 通过Anubis检查的哈希值iat: 令牌签发时间nbf: 发出令牌前一分钟exp: 令牌签发后的到期周
这样可以确保令牌有足够的元数据来证明令牌是有效的(由于令牌的签名),同时也使服务器可以独立证明令牌是有效的。允许设置此 cookie 而不触发欧盟 cookie 横幅通知;但根据事实和情况,您可能希望向用户披露这一点。
JWT 签名
Anubis 使用 ed25519 密钥对签署通过挑战时发布的 JWT。Anubis 每次启动时都会生成一个新的 ed25519 密钥对。目前,Anubis 无法在不同实例之间共享该密钥对,但未来版本会解决这个问题。
Anubis为什么使用工作证明?
Anubis使用工作证明来验证客户端的真实性。Anubis 这样做的原因是受到Hashcash的启发,[Hashcash]是 2000 年早期提出的一个关于扩展电子邮件协议以避免垃圾邮件的建议。这个想法是,发送电子邮件的真实用户必须解决一个计算成本高但易于验证的小数学问题,例如对一个带有给定零头的字符串进行散列。这对每周发送几封邮件的个人来说基本上没有影响,但对大量发送广告的公司来说,就必须进行昂贵的计算。这也是比特币共识算法的工作原理。
Anubis 的工作证明方案是如何运作的
sha256 哈希值是这样的一串字节:
394d1cc82924c2368d4e34fa450c6b30d5d02f8ae4bb6310e2296593008ff89f我们通常以十六进制形式写出来,但这就是 ram 中字节的字面意思。在工作证明验证系统中,你需要一些基础值(“挑战”)和一个不断递增的数字(“nonce”),所以你最终散列的东西是这样的:
const hash = await sha256(`${challenge}${nonce}`);为了通过挑战,“哈希值 ”必须有适当数量的前导零(“难度”)。当客户请求通过挑战时,他们会附上所使用的 nonce。然后,服务器只需进行一次 sha256 操作:确认挑战(由请求元数据生成)和非ce(由客户端提供)与前导零的难度数相匹配。
归根结底,这是一个黑客程序,其真正目的是提供一个 “足够好 ”的占位解决方案,以便将更多时间花在无头浏览器的指纹识别和识别上(EG 通过它们如何进行字体渲染),这样就无需向已知的合法用户展示挑战证明页面了。
管理指南:配置
挑战方法
Anubis 支持多种挑战方法:
- 元刷新
- 工作证明
元刷新(无 JavaScript)
元刷新 “挑战会向浏览器发送一个简单得多的挑战,让浏览器在设定时间后刷新页面。这样,客户端就能在不执行 JavaScript 的情况下通过挑战。
要在 Anubis 配置中使用它,请访问
# Generic catchall rule
- name: generic-browser
  user_agent_regex: >-
    Mozilla|Opera
  action: CHALLENGE
  challenge:
    difficulty: 1 # Number of seconds to wait before refreshing the page
    report_as: 4 # Unused by this challenge method
    algorithm: metarefresh # Specify a non-JS challenge method
默认情况下不启用此功能,但会对该方法进行测试并确定其误报率。许多现代网络爬虫程序使用无头 Google Chrome 浏览器,因此误报率会更高。
工作证明(JavaScript)
当 Anubis 被配置为使用 “快 ”或 “慢 ”挑战方法时,客户端将收到一个小的工作证明 挑战。为了获得用于访问上游资源的令牌,客户端必须用 JavaScript 计算一个复杂的数学谜题。
快速 “挑战使用大量优化的多线程实现,”慢速 “挑战使用简单的单线程实现。慢速 “方法是为了与传统方法兼容而保留的。
Anubis 错误的自定义状态代码
开箱即用时,Anubis 会以 HTTP 200 回应挑战和拒绝页面。这样做的目的是让人工智能网络爬虫程序在处理您的网站时遇到困难,因为当它们遇到非 200 的响应时,就会一遍又一遍地敲击页面,直到得到 200 的响应。这种行为可能并不可取,因此 Anubis 可让您自定义 Anubis 发送挑战和拒绝页面时返回的 HTTP 状态代码。
这可以在僵尸策略文件的 “status_codes ”块中配置:
status_codes:
  CHALLENGE: 200
  DENY: 200
要与 CloudFlare 的行为相匹配,请使用如下配置:
status_codes:
  CHALLENGE: 403
  DENY: 403
基于表达式的规则匹配
大多数 Anubis 匹配器都允许您匹配请求的单个部分,而且只能单独匹配这些部分。为了对服务进行深度防护,您通常需要对请求的多个方面进行匹配。Anubis 实现了通用表达式语言 (CEL),让管理员可以定义这些更高级的规则。这样,您就可以针对所保护的单个服务定制自己的方法。
例如,这里有一条允许通过 Anubis 发送 JSON API 请求的规则:
- name: allow-api-requests
  action: ALLOW
  expression:
    all:
      - '"Accept" in headers'
      - 'headers["Accept"] == "application/json"'
      - 'path.startsWith("/api/")'
这是一项高级功能,因此很容易给自己带来麻烦。请谨慎使用。
Common Expression Language (CEL)
CEL 是一种表达式语言,由 Google 制作,是其访问控制列表系统的一部分。随着程序越来越复杂,用户需要表达更复杂的安全要求,他们往往希望能运行一小段代码来自行检查。CEL 表达式就是为此而设计的。这些表达式被隐含在沙箱中,因此不会影响其运行的系统,而且在设计上也尽可能快地进行评估。
将 CEL 表达式想象成 JavaScript 中的 if 语句或 SQL 中的 WHERE 子句的内容。请看这个表达式示例:
userAgent == ""这大致相当于 JavaScript 中的以下内容:
if (userAgent == "") {
  // Do something
}
使用这些表达式,您可以根据事实和情况的需要定义更复杂的规则。有关 CEL 语法和语法的更多信息,请参阅语言规范。
Anubis 如何使用 CEL
Anubis 使用 CEL 让管理员创建复杂的过滤规则。Anubis 有几种使用 CEL 的模式:
- 根据单一表达式验证请求
- 验证多个表达式,并确保其中至少有一个表达式为真(“任意)
- 验证多个表达式并确保所有表达式为真(
all)。
常见的模式是每个 Anubis 表达式都返回 “true”、“false ”或引发错误。
单一表达式
返回 true 或 false 的单一表达式。如果表达式返回 true,则将执行规则中指定的操作。如果返回 “false”,Anubis 将进入下一条规则。
例如,请看这条规则:
- name: no-user-agent-string
  action: DENY
  expression: userAgent == ""
对于该规则,如果请求未设置 [`用户代理字符串],Anubis 将拒绝该请求并返回错误页面。
any 块
一个包含表达式列表的 any 块。如果列表中的任何表达式返回 true,则将执行规则中指定的操作。如果该列表中的所有表达式都返回 “false”,则 Anubis 将继续执行下一条规则。
例如,请看这条规则:
- name: known-banned-user
  action: DENY
  expression:
    any:
      - remoteAddress == "8.8.8.8"
      - remoteAddress == "1.1.1.1"
对于这条规则,如果有来自 8.8.8.8 或 1.1.1.1 的请求,Anubis 将拒绝该请求并返回错误页面。
all 块
包含表达式列表的 all 块。如果列表中的所有表达式都返回 true,则将执行规则中指定的操作。如果列表中的任何一个表达式返回 “false”,Anubis 将转到下一条规则。
例如,请看这条规则:
- name: go-get
  action: ALLOW
  expression:
    all:
      - userAgent.startsWith("Go-http-client/")
      - '"go-get" in query'
- query["go-get"] == "1"对于这条规则,如果有请求符合“go get ”命令的签名,Anubis 将允许它通过目标。
暴露于 Anubis 表达式的变量
Anubis 向表达式公开了以下变量:
| Name | Type | Explanation | Example |
|---|---|---|---|
headers |
map[string, string] |
The headers of the request being processed. | {"User-Agent": "Mozilla/5.0 Gecko/20100101 Firefox/137.0"} |
host |
string |
The HTTP hostname the request is targeted to. | anubis.techaro.lol |
load_1m |
double |
The current system load average over the last one minute. This is useful for making load-based checks. | |
load_5m |
double |
The current system load average over the last five minutes. This is useful for making load-based checks. | |
load_15m |
double |
The current system load average over the last fifteen minutes. This is useful for making load-based checks. | |
method |
string |
The HTTP method in the request being processed. | GET, POST, DELETE, etc. |
path |
string |
The path of the request being processed. | /, /api/memes/create |
query |
map[string, string] |
The query parameters of the request being processed. | ?foo=bar -> {"foo": "bar"} |
remoteAddress |
string |
The IP address of the client. | 1.1.1.1 |
userAgent |
string |
The User-Agent string in the request being processed. |
Mozilla/5.0 Gecko/20100101 Firefox/137.0 |
值得注意的是:在许多语言中,当您查找映射表中的键时,如果什么都没有,语言会返回一些 “虚假 ”值,如 JavaScript 中的 undefined、Python 中的 None 或 Go 中类型的零值。在 CEL 中,如果尝试查找不存在的值,表达式的执行将失败,Anubis 将返回错误。
为了避免这种情况,请确保您要测试的头或查询参数在请求中存在,并使用类似下面的 all 块:
- name: challenge-wiki-history-page
  action: CHALLENGE
  all:
    - 'path == "/index.php"'
    - '"title" in query'
    - '"action" in query'
    - 'query["action"] == "history"'
当且仅当以下所有条件均为真时,此规则才会抛出挑战:
- URL 路径为 `/index.php
- URL 查询字符串包含一个
title值 - URL 查询字符串包含一个
action值 - URL 查询字符串的
action值是“history”。
因此,给定这样一个 HTTP 请求
GET /index.php?title=Index&action=history HTTP/1.1
User-Agent: Mozilla/5.0 Gecko/20100101 Firefox/137.0
Host: wiki.int.techaro.lol
X-Real-Ip: 8.8.8.8
Anubis 会返回一个挑战,因为所有这些条件都为真。
使用系统负载平均值
在类 Unix 系统(如 Linux)中,系统上的每个进程都必须等待轮到自己才能运行。这意味着系统上运行的进程越多,它们需要等待的时间就越长。平均负载 表示希望运行但尚未运行的进程数量。这个指标对于确定原因并不是最可靠的,但对于帮助确定症状却很有帮助。
Anubis 允许你将系统平均负载作为表达式的输入,这样你就可以制定动态规则,比如 “当系统负载较低时,调低保护,但当负载较高时,调高保护”。这样,你就能在后台获得 Anubis 的所有拦截功能,但只有在系统受到主动攻击时,才会真正向用户暴露 Anubis。
最好与权重 和阈值 系统结合使用,这样就能让 Anubis 对攻击做出动态响应。请考虑默认配置文件中的这些规则:
## System load based checks.
# If the system is under high load for the last minute, add weight.
- name: high-load-average
  action: WEIGH
  expression: load_1m >= 10.0 # make sure to end the load comparison in a .0
  weight:
    adjust: 20

# If it is not for the last 15 minutes, remove weight.
- name: low-load-average
  action: WEIGH
  expression: load_15m <= 4.0 # make sure to end the load comparison in a .0
  weight:
    adjust: -10
这种规则组合使 Anubis 能够动态响应系统负载,只有在系统受到攻击时才会启动。
关于系统平均负载,需要注意的是,它并不了解系统的内核数量。如果一个 16 核系统有 16 个进程在运行,但没有一个进程占用 CPU,那么平均负载就会低于 16。如果有疑问,“高负载 ”指标至少应为 CPU 内核数的两倍,“低负载 ”指标至少应为 CPU 内核数的一半。例如
| Kind | Core count | Load threshold |
|---|---|---|
| high load | 4 | 8.0 |
| low load | 4 | 2.0 |
| high load | 16 | 32.0 |
| low load | 16 | 8 |
另外请记住,这并不包括其他类型的延迟,如 I/O 延迟。一个系统的网络应用程序可能会因为来自 MySQL 服务器的高延迟而反应迟钝,但该网络应用程序服务器仍会报告负载接近或为零。
##暴露于 Anubis 表达式的函数
Anubis 表达式可以使用以下函数进行增强:
missingHeader
在 bot 表达式中可用。
function missingHeader(headers: Record<string, string>, key: string) bool如果请求不包含头信息,则 missingHeader 返回 true。这在断言以下行为时非常有用:
# Adds weight to old versions of Chrome
- name: old-chrome
  action: WEIGH
  weight:
    adjust: 10
  expression:
    all:
      - userAgent.matches("Chrome/[1-9][0-9]?\\.0\\.0\\.0")
      - missingHeader(headers, "Sec-Ch-Ua")
randInt
可用于所有表达式。
function randInt(n: int): int;randInt 返回一个在[0,n)范围内随机选择的整数值。这是Go’s math/rand#Intn的精简包装。请小心使用,因为它可能会给真正的用户带来不一致的行为。
最好在执行显式块规则时使用,例如
# Denies LightPanda about 75% of the time on average
- name: deny-lightpanda-sometimes
  action: DENY
  expression:
    all:
      - userAgent.matches("LightPanda")
      - randInt(16) >= 4
有时允许已知的不良客户端通过似乎有违直觉,但这可以让 Anubis 的行为随机化,从而迷惑攻击者。根据实际情况调整阈值和数字。
segments
在 bot 表达式中可用。
function segments(path: string): string[];segments 返回以斜线分隔的路径段的数量,忽略前导斜线。下面是一些常见路径的返回值:
| Input | Output |
|---|---|
segments("/") |
[""] |
segments("/foo/bar") |
["foo", "bar"] |
segments("/users/xe/") |
["users", "xe", ""] |
注意
如果路径以 / 结尾,那么结果的最后一个元素将是空字符串。这是因为 /users/xe 和 /users/xe/ 是语义不同的路径。
如果您想编写规则,规定只有在请求的路径段少于两个时才允许无查询参数的请求,那么这一点就很有用:
- name: two-path-segments-no-query
  action: ALLOW
  expression:
    all:
      - size(query) == 0
      - size(segments(path)) < 2
Life advice
表达式非常强大。这既是好处,也是负担。如果不注意表达的目标,就很容易给自己带来麻烦。如果您有任何疑问,请使用 “挑战 ”而不是 “拒绝”。合法用户可以通过工作证明挑战轻松绕过 “CHALLENGE ”结果。机器人不太可能做到这一点。
导入配置规则
Anubis 允许你将配置片段导入主配置文件。这样,你就能将配置分解成更小的部分,再按逻辑组装成一个大文件。
EG:
bots:
  # Pathological bots to deny
  - # This correlates to data/bots/ai-catchall.yaml in the source tree
    import: (data)/bots/ai-catchall.yaml
  - import: (data)/bots/cloudflare-workers.yaml
值得注意的是,机器人规则既可以内嵌机器人配置,也可以导入机器人配置片段。您不能在一个僵尸规则中同时使用这两种配置。
bots:
  - import: (data)/bots/ai-catchall.yaml
    name: generic-browser
    user_agent_regex: >
      Mozilla|Opera
    action: CHALLENGE
这将返回如下错误:
config is not valid:
config.BotOrImport: rule definition is invalid, you must set either bot rules or an import statement, not both路径可以以(data)为前缀,以便从Anubis 源代码树中的数据文件夹或文件系统中的任何位置导入。如果你没有访问 Anubis 源代码树的权限,请查看 /usr/share/docs/anubis/data 或你解压缩 Anubis 的压缩包。
从导入文件导入
如果想一次性导入整个文件夹的规则,也可以从导入文件中导入。
bots:
  - import: (data)/bots/_deny-pathological.yaml
这可以让您一次性导入整个规则集:
# (data)/bots/_deny-pathological.yaml
- import: (data)/bots/cloudflare-workers.yaml
- import: (data)/bots/headless-browsers.yaml
- import: (data)/bots/us-ai-scraper.yaml
请谨慎使用,稍有不慎就会导致 Anubis 永远递归导入。最好的方法是创建一个名为 _everything.yaml或 _allow-good.yaml的 “根导入”,这样它们就会排序在最前面。用执行的主要动词命名元导入,这样你就能在配置文件中看到并理解它在做什么。
编写片段
片段可以用 JSON 或 YAML 编写,YAML 更受青睐。编写片段时,请将所需的机器人规则直接写在文件顶层的列表中。
下面是一个允许通过 Anubis 使用IPv6 唯一本地地址的示例片段:
- name: ipv6-ula
  action: ALLOW
  remote_addresses:
    - fc00::/7
提取 Anubis 的嵌入式文件系统
您可以使用此命令提取嵌入到 Anubis 二进制文件中的规则列表:
anubis --extract-resources=static这将把 Anubis 嵌入数据的内容转储到名为 static 的新文件夹中:
static
├── apps
│   └── gitea-rss-feeds.yaml
├── botPolicies.json
├── botPolicies.yaml
├── bots
│   ├── ai-catchall.yaml
│   ├── cloudflare-workers.yaml
│   ├── headless-browsers.yaml
│   └── us-ai-scraper.yaml
├── common
│   ├── allow-private-addresses.yaml
│   └── keep-internet-working.yaml
└── crawlers
    ├── bingbot.yaml
    ├── duckduckbot.yaml
    ├── googlebot.yaml
    ├── internet-archive.yaml
    ├── kagibot.yaml
    ├── marginalia.yaml
    ├── mojeekbot.yaml
    └── qwantbot.yaml
Imprint / Impressum 配置
某些司法管辖区(如欧盟,特别是德国)必须在版本说明/版本说明页面上免费提供联系信息。Anubis 支持使用僵尸策略文件中的 impressum 块为您的组织创建 Anubis 专用的印记页面。例如
impressum:
  # Displayed at the bottom of every page rendered by Anubis.
  footer: >-
    This website is hosted by Techaro. If you have any complaints or notes
    about the service, please contact
    <a href="mailto:contact@techaro.lol">contact@techaro.lol</a> and we
    will assist you as soon as possible.

  # The imprint page that will be linked to at the footer of every Anubis page.
  page:
    # The HTML <title> of the page
    title: Imprint and Privacy Policy
    # The HTML contents of the page. The exact contents of this page can
    # and will vary by locale. Please consult with a lawyer if you are not
    # sure what to put here
    body: >-
      <p>Last updated: June 2025</p>

      <h2>Information that is gathered from visitors</h2>

      <p>In common with other websites, log files are stored on the web server saving details such as the visitor's IP address, browser type, referring page and time of visit.</p>

      <p>Cookies may be used to remember visitor preferences when interacting with the website.</p>

      <p>Where registration is required, the visitor's email and a username will be stored on the server.</p>

<!-- ... -->如果您订阅并使用高级分类功能,请务必披露以下内容:
<h2>Techaro Anubis</h2>

<p>
  This website uses a service called
  <a href="https://anubis.techaro.lol">Anubis</a> by
  <a href="https://techaro.lol">Techaro</a> to filter malicious traffic. Anubis
  requires the use of browser cookies to ensure that web clients are running
  conformant software. Anubis also may report the following data to Techaro to
  improve service quality:
</p>

<ul>
  <li>
    IP address (for purposes of matching against geo-location and BGP autonomous
    systems numbers), which is stored in-memory and not persisted to disk.
  </li>
  <li>
    Unique browser fingerprints (such as HTTP request fingerprints and
    encryption system fingerprints), which may be stored on Techaro's side for a
    period of up to one month.
  </li>
  <li>
    HTTP request metadata that may include things such as the User-Agent header
    and other identifiers.
  </li>
</ul>

<p>
  This data is processed and stored for the legitimate interest of combatting
  abusive web clients. This data is encrypted at rest as much as possible and is
  only decrypted in memory for the purposes of fulfilling requests.
</p>
Open Graph 配置
本页详细介绍了如何在 Anubis 中配置Open Graph 标签直通。这样就可以对受 Anubis 保护的资源进行社交预览,而无需对每个网络爬虫进行单独豁免。
配置选项
Open Graph 设置在策略文件的 “openGraph ”部分进行配置。
openGraph:
  # Enables Open Graph passthrough
  enabled: true
  # Enables the use of the HTTP host in the cache key, this enables
  # caching metadata for multiple http hosts at once.
  considerHost: true
  # How long cached OpenGraph metadata should last in memory
  ttl: 24h
  # If set, return these opengraph values instead of looking them up with
  # the target service.
  #
  # Correlates to properties in https://ogp.me/
  override:
    # og:title is required, it is the title of the website
    "og:title": "Techaro Anubis"
    "og:description": >-
      Anubis is a Web AI Firewall Utility that helps you fight the bots
      away so that you can maintain uptime at work!
    "description": >-
      Anubis is a Web AI Firewall Utility that helps you fight the bots
      away so that you can maintain uptime at work!
详细信息]
Configuration flags / envvars (old)
## 使用
使用方法
要配置 Open Graph 标签,可以在 Anubis 配置中设置以下环境变量、环境文件或标志:
export OG_PASSTHROUGH=true
export OG_EXPIRY_TIME=1h
export OG_CACHE_CONSIDER_HOST=false
实现细节
启用 “OG_PASSTHROUGH ”后,Anubis 将
-
- 检查请求 URL 的 Open Graph 标签的本地缓存。
- 如果缓存条目存在且仍然有效,则返回缓存标签。
- 如果缓存条目过期或未找到,则获取 URL、解析 Open Graph 标记、更新缓存并返回新标记。
缓存过期时间由 OG_EXPIRY_TIME控制。
启用 OG_CACHE_CONSIDER_HOST 后,Anubis 将在 Open Graph 标签的缓存密钥中包含主机。这将确保不同主机的标签分别缓存。
示例
以下是如何在 Anubis 设置中配置 Open Graph 标签的示例:
export OG_PASSTHROUGH=true
export OG_EXPIRY_TIME=1h
export OG_CACHE_CONSIDER_HOST=false
通过这些设置,Anubis 将缓存 Open Graph 标签 1 小时,并将其传递到挑战页面,而不考虑缓存密钥中的主机。
何时启用 OG_CACHE_CONSIDER_HOST?
在大多数情况下,您希望将 OG_CACHE_CONSIDER_HOST 设置为 false,以避免不必要的缓存碎片。不过,在某些情况下,启用该选项会有好处:
- 多租户应用程序: 如果您正在运行一个多租户应用程序,其中不同的租户托管在不同的子域上,启用
OG_CACHE_CONSIDER_HOST可确保为每个租户分别缓存 Open Graph 标签。这可以防止一个租户的 Open Graph 标签被提供给另一个租户的用户。 - 为不同主机提供不同内容: 如果您的应用程序根据主机提供不同的内容,启用
OG_CACHE_CONSIDER_HOST可确保为每个主机缓存和提供正确的 Open Graph 标签。这对于为不同域名或子域提供不同品牌或内容的应用程序非常有用。 - 安全和隐私问题: 在某些情况下,出于安全或隐私原因,您可能希望确保 Open Graph 标签不在不同主机之间共享。启用 “OG_CACHE_CONSIDER_HOST ”可确保为每台主机单独缓存标签,从而防止主机之间任何潜在的信息泄露。
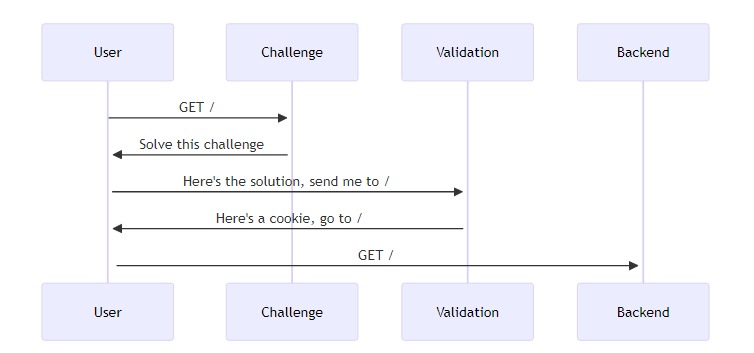
##重定向域配置
Anubis 的检查验证逻辑中间有一个 HTTP 重定向。该重定向允许 Anubis 在已验证的请求上设置 cookie,这样用户就不必在每次页面加载时都通过挑战。
流程如下
不过,在某些情况下,有心的攻击者可以诱骗用户点击预先填写了解决方案的验证链接。例如
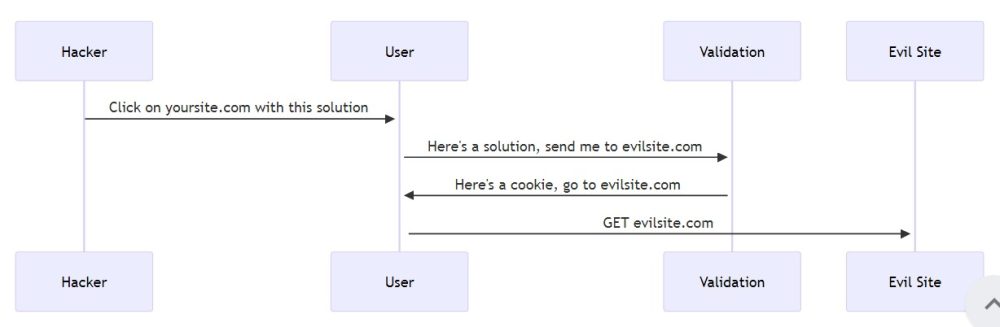
如果出现这种情况,Anubis 将抛出如下错误:
Redirect domain not allowed配置允许的重定向域
默认情况下,Anubis 会将重定向限制在与 Anubis 运行相同的 HTTP Host 上(例如:对 yoursite.com 的请求不能重定向到 yoursite.com 以外)。如果需要设置多个域,请在 REDIRECT_DOMAINS 环境变量中填入以逗号分隔的域名列表,以便 Anubis 允许重定向到这些域名。
注意
这些域名是_精确字符串匹配_,不支持通配符匹配。
环境文件
# anubis.env

REDIRECT_DOMAINS="yoursite.com,secretplans.yoursite.com"
# ...
对接程序编译
services:
  anubis-nginx:
    image: ghcr.io/techarohq/anubis:latest
    environment:
      REDIRECT_DOMAINS: "yoursite.com,secretplans.yoursite.com"
      # ...
库伯网络
在您的部署、StatefulSet 或 Pod 中:
- name: anubis
  image: ghcr.io/techarohq/anubis:latest
  env:
    - name: REDIRECT_DOMAINS
      value: "yoursite.com,secretplans.yoursite.com"
    # ...
子请求验证
Anubis 可在两种模式中选择一种:
- 反向代理(默认): Anubis 位于所有流量的中间,然后将流量反向代理到目的地。这就相当于你最喜欢的网络框架中的中间件。
- 子请求验证模式: Anubis 会监听请求,如果请求没有通过审核,就会转发给 Anubis 进行挑战处理。这就相当于 Anubis 是一个辅助服务。
注意
子请求验证需要更改默认策略,因为nginx会将默认的 “DENY ”状态代码 “200 ”解释为验证成功,并允许请求。
status_codes:
  CHALLENGE: 200
DENY: 403Nginx
Anubis可以使用Nginx的auth_request模块执行子请求认证。设置时,请注意以下事项:
Anubis 中的 TARGET 环境变量必须设置为空格,例如
环境文件
# anubis.env

TARGET=" "
# ...
Docker Compose
services:
  anubis-nginx:
    image: ghcr.io/techarohq/anubis:latest
    environment:
      TARGET: " "
      # ...
库伯网络
在您的部署、StatefulSet 或 Pod 中:
- name: anubis
  image: ghcr.io/techarohq/anubis:latest
  env:
    - name: TARGET
      value: " "
    # ...
为了配置此功能,您需要在指向要保护的服务的每个服务器上添加以下位置块:
location /.within.website/ {
    # Assumption: Anubis is running in the same network namespace as
    # nginx on localhost TCP port 8923
    proxy_pass http://127.0.0.1:8923;
    proxy_set_header X-Real-IP $remote_addr;
    proxy_set_header X-Forwarded-For $proxy_add_x_forwarded_for;
    proxy_set_header Host $http_host;
    proxy_pass_request_body off;
    proxy_set_header content-length "";
    auth_request off;
}

location @redirectToAnubis {
    return 307 /.within.website/?redir=$scheme://$host$request_uri;
    auth_request off;
}
这将设置 /.within.website 指向 Anubis。任何被 Anubis 拒绝或提出异议的请求都将发送到这里。这还会设置一个命名位置 @redirectToAnubis,将任何请求重定向到 Anubis 进行高级处理。
最后,将此添加到根位置块中:
location / {
    auth_request /.within.website/x/cmd/anubis/api/check;
    error_page 401 = @redirectToAnubis;
}
这将检查所有与 Anubis 的其他位置不匹配的请求,以确保客户端是真实的。
这将使每个请求在进入后台之前都经过 Anubis 的检查。如果您有不需要 Anubis 进行验证的其他位置,请在其块中添加 auth_request off 指令:
location /secret {
    auth_request off;

    # ...
}
下面是一个通过 TLS 进行监听并指向 Anubis 的 Nginx 服务器的完整示例:
完整示例
[详细信息]
# /etc/nginx/conf.d/nginx.local.cetacean.club.conf

server {
  listen 443 ssl;
  listen [::]:443 ssl;
  server_name         nginx.local.cetacean.club;
  ssl_certificate     /etc/techaro/pki/nginx.local.cetacean.club/tls.crt;
  ssl_certificate_key /etc/techaro/pki/nginx.local.cetacean.club/tls.key;
  ssl_protocols       TLSv1.2 TLSv1.3;
  ssl_ciphers         HIGH:!aNULL:!MD5;

  proxy_set_header X-Real-IP $remote_addr;
  proxy_set_header X-Forwarded-For $proxy_add_x_forwarded_for;

  location /.within.website/ {
    proxy_pass http://localhost:8923;
    auth_request off;
  }

  location @redirectToAnubis {
    return 307 /.within.website/?redir=$scheme://$host$request_uri;
    auth_request off;
  }

  location / {
    auth_request /.within.website/x/cmd/anubis/api/check;
    error_page 401 = @redirectToAnubis;
    root /usr/share/nginx/html;
    index index.html index.htm;
  }
}
权重阈值配置
Anubis 提供为请求分配 “权重 ”的功能。这是一个自定义的怀疑级别,规则可以对其进行添加或删除。例如,以下是为任何可能是浏览器的请求分配 10 个权重点的方法:
# botPolicies.yaml

bots:
  - name: generic-browser
    user_agent_regex: >-
      Mozilla|Opera
    action: WEIGH
    weight:
      adjust: 10
阈值可让您获取每个请求的权重值并采取相应措施。阈值与机器人配置一起定义在 botPolicies.yaml中。
注意
当请求与带有 CHALLENGE 动作的机器人规则相匹配时,阈值不起作用。阈值只适用于请求不匹配任何终端僵尸规则的情况。
# botPolicies.yaml

bots: ...

thresholds:
  - name: minimal-suspicion
    expression: weight < 0
    action: ALLOW

  - name: mild-suspicion
    expression:
      all:
        - weight >= 0
        - weight < 10
    action: CHALLENGE
    challenge:
      algorithm: metarefresh
      difficulty: 1
      report_as: 1

  - name: moderate-suspicion
    expression:
      all:
        - weight >= 10
        - weight < 20
    action: CHALLENGE
    challenge:
      algorithm: fast
      difficulty: 2
      report_as: 2

  - name: extreme-suspicion
    expression: weight >= 20
    action: CHALLENGE
    challenge:
      algorithm: fast
      difficulty: 4
      report_as: 4
这定义了一套 4 个阈值:
- 如果请求权重小于零,则允许通过。
- 如果请求权重大于或等于零,但小于 10:给它一个非常轻量级的挑战。
- 如果请求权重大于或等于 10,但小于 20:给它一个稍重的挑战。
- 否则,给予 最重的挑战。
可以使用以下选项配置阈值:
| Name | Description | Example |
|---|---|---|
name |
The human-readable name for this threshold. |
|
expression |
A CEL expression taking the request weight and returning true or false | To check if the request weight is less than zero:
To check if it’s between 0 and 10 (inclusive): |
action |
The Anubis action to apply: ALLOW, CHALLENGE, or DENY |
If you set the CHALLENGE action, you must set challenge details: |
环境
有关 Anubis 可配合使用的个别环境(如 HTTP 服务器、平台等)的详细信息。
[/详细信息]
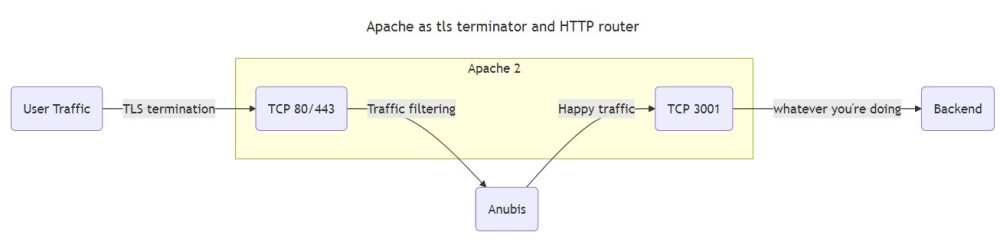
Apache
Anubis 的目的是成为过滤器代理。整合的方法是将配置分成两部分: TLS 终止和 HTTP 路由。请看下图:
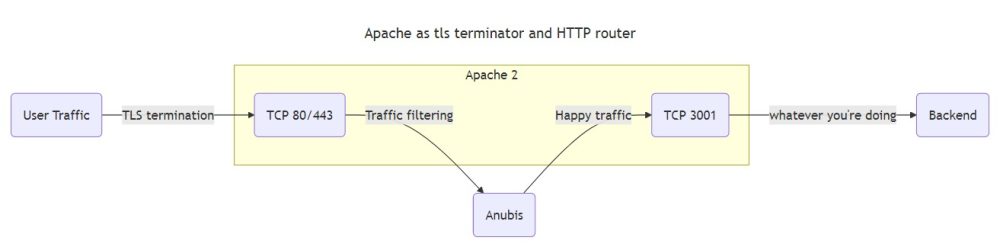
实际上,您需要通过 Apache 进行一次 TLS 终结,然后绕道 Anubis 进行流量清洗,最后直接进入后端。最后这个套接字将执行 HTTP 路由。
注意
这些示例假定您使用的设置是 Apache 配置由/etc/httpd/conf.d/*.conf中的大量文件组成。但并非所有 Apache 部署都是如此。如果您不在这种环境中,请将这些代码段添加到您的 /etc/httpd/conf/httpd.conf 文件中。
配置
假设您正在保护 anubistest.techaro.lol,您需要以下服务器配置块:
- 将 HTTP 转发为 HTTPS 的 80 端口配置块
- 端口 443 上的拦截,用于终止 TLS 并转发至 Anubis
- 封锁 3001 端口,实际为您的网站提供服务
# Plain HTTP redirect to HTTPS
<VirtualHost *:80>
       ServerAdmin your@email.here
       ServerName anubistest.techaro.lol
       DocumentRoot /var/www/anubistest.techaro.lol
       ErrorLog /var/log/httpd/anubistest.techaro.lol_error.log
       CustomLog /var/log/httpd/anubistest.techaro.lol_access.log combined
       RewriteEngine on
       RewriteCond %{SERVER_NAME} =anubistest.techaro.lol
       RewriteRule ^ https://%{SERVER_NAME}%{REQUEST_URI} [END,NE,R=permanent]
</VirtualHost>

# HTTPS listener that forwards to Anubis
<IfModule mod_proxy.c>
<VirtualHost *:443>
       ServerAdmin your@email.here
       ServerName anubistest.techaro.lol
       DocumentRoot /var/www/anubistest.techaro.lol
       ErrorLog /var/log/httpd/anubistest.techaro.lol_error.log
       CustomLog /var/log/httpd/anubistest.techaro.lol_access.log combined

       SSLCertificateFile /etc/letsencrypt/live/anubistest.techaro.lol/fullchain.pem
       SSLCertificateKeyFile /etc/letsencrypt/live/anubistest.techaro.lol/privkey.pem
       Include /etc/letsencrypt/options-ssl-apache.conf

       # These headers need to be set or else Anubis will
       # throw an "admin misconfiguration" error.
       RequestHeader set "X-Real-Ip" expr=%{REMOTE_ADDR}
       RequestHeader set X-Forwarded-Proto "https"
       RequestHeader set "X-Http-Version" "%{SERVER_PROTOCOL}s"

       ProxyPreserveHost On

       ProxyRequests Off
       ProxyVia Off

       # Replace 9000 with the port Anubis listens on
       ProxyPass / http://[::1]:9000/
       ProxyPassReverse / http://[::1]:9000/
</VirtualHost>
</IfModule>

# Actual website config
<VirtualHost *:3001>
       ServerAdmin your@email.here
       ServerName anubistest.techaro.lol
       DocumentRoot /var/www/anubistest.techaro.lol
       ErrorLog /var/log/httpd/anubistest.techaro.lol_error.log
       CustomLog /var/log/httpd/anubistest.techaro.lol_access.log combined
</VirtualHost>
确保为 3001 端口上的监听器添加单独的配置文件:
# /etc/httpd/conf.d/listener-3001.conf

Listen [::1]:3001
如果您运行的是纯 IPv4 系统,请使用以下配置:
# /etc/httpd/conf.d/listener-3001.conf

Listen 127.0.0.1:3001
多个站点可重复此操作。Anubis 不关心 HTTP 的 “Host ”头,可以通过同一实例轻松处理多个网站。
然后重新加载 Apache 配置并加载网站。您应该会看到 Anubis 正在保护您的应用程序!
sudo systemctl reload httpd.service疑难解答
以下是测试过程中遇到的一些问题的答案:
我在 Red Hat 发行版上运行,每次页面加载时 Apache 都提示 “服务不可用” “Direct link to 我在 Red Hat 发行版上运行,每次页面加载时 Apache 都提示 ”服务不可用“”)
如果你在每次页面加载时都看到 “服务不可用 ”的错误,并且运行的是 Red Hat 衍生发行版,那么你缺少了 “selinux ”设置。确切的命令会出现在 journalctl 日志信息中,如下所示:
*****  Plugin catchall_boolean (89.3 confidence) suggests   ******************

If you want to allow HTTPD scripts and modules to connect to the network using TCP.
Then you must tell SELinux about this by enabling the 'httpd_can_network_connect' boolean.

Do
setsebool -P httpd_can_network_connect 1
这将立即修复错误。
Caddy
要将 Anubis 与 Caddy 结合使用,请将 Anubis 放在 Caddy 与后端之间。例如,请考虑以下应用程序设置:
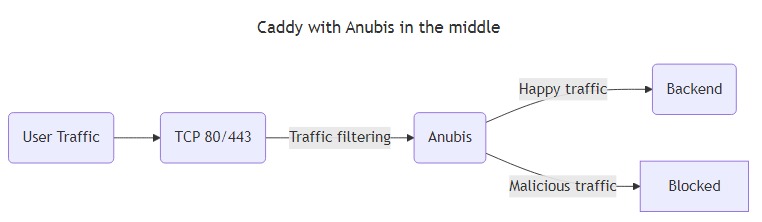
流量不会直接进入后端,而是绕道经过 Anubis。Anubis 会过滤掉 “坏 ”流量,将 “好 ”流量传递到后端。
要使用 Docker compose 和 Caddy 设置 Anubis,请从类似这样的 docker-compose 配置开始:
services:
  caddy:
    image: caddy:2
    ports:
      - 80:80
      - 443:443
      - 443:443/udp
    volumes:
      - ./conf:/etc/caddy
      - caddy_config:/config
      - caddy_data:/data

  anubis:
    image: ghcr.io/techarohq/anubis:latest
    pull_policy: always
    environment:
      BIND: ":3000"
      TARGET: http://httpdebug:3000

  httpdebug:
    image: ghcr.io/xe/x/httpdebug
    pull_policy: always

volumes:
  caddy_data:
  caddy_config:
然后在 conf/Caddyfile 中输入以下内容:
# conf/Caddyfile

yourdomain.example.com {
  tls your@email.address

  reverse_proxy http://anubis:3000 {
    header_up X-Real-Ip {remote_host}
    header_up X-Http-Version {http.request.proto}
  }
}
如果你想用 Anubis 保护多个服务,你需要启动多个 Anubis 实例(Anubis 平均需要的内存小于 32 MB),或者设置一个双层路由设置,其中 TLS 终止由一个 Caddy 实例完成,而实际路由到服务则由另一个 Caddy 实例完成。请参阅 nginx 或 Apache 文档,了解如何实现这一点。
Docker compose
Docker compose 通常与 Apache 或 Nginx 等其他负载均衡器配合使用。下面是一个最简单的示例,向你展示如何建立一个在主机端口 8080 上监听的 Anubis 实例,该实例指向一个静态网站,其中包含./www中的数据:
services:
  anubis:
    image: ghcr.io/techarohq/anubis:latest
    environment:
      BIND: ":8080"
      DIFFICULTY: "4"
      METRICS_BIND: ":9090"
      SERVE_ROBOTS_TXT: "true"
      TARGET: "http://nginx"
      POLICY_FNAME: "/data/cfg/botPolicy.yaml"
      OG_PASSTHROUGH: "true"
      OG_EXPIRY_TIME: "24h"
    healthcheck:
      test: ["CMD", "anubis", "--healthcheck"]
      interval: 5s
      timeout: 30s
      retries: 5
      start_period: 500ms
    ports:
      - 8080:8080
    volumes:
      - "./botPolicy.yaml:/data/cfg/botPolicy.yaml:ro"

  nginx:
    image: nginx
    volumes:
      - "./www:/usr/share/nginx/html"
Kubernetes
在 Kubernetes 中设置 Anubis 时,你需要确保通过 Anubis 发送请求,就像这样:
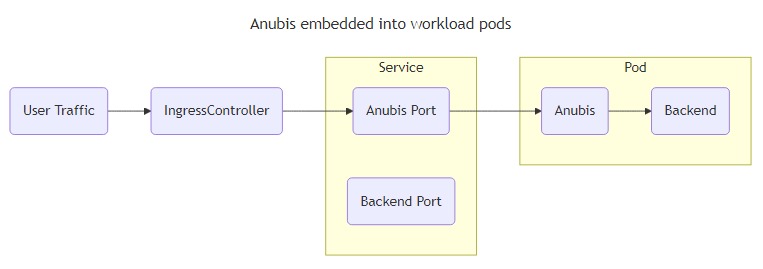
Anubis 足够轻量级,你应该可以让它的多个实例运行,而不会有太多问题。如果你担心这个问题,请查看 ingress-anubis。
本例有以下假设:
- 目标服务监听 TCP 端口
5000。 - Anubis 将监听端口
8080。
根据实际情况调整这些值。
创建一个包含 Anubis 应为其响应使用的签名密钥的秘密:
kubectl create secret generic anubis-key \
  --namespace default \
  --from-literal=ED25519_PRIVATE_KEY_HEX=$(openssl rand -hex 32)
将 Anubis 附加到部署中:
containers:
  # ...
  - name: anubis
    image: ghcr.io/techarohq/anubis:latest
    imagePullPolicy: Always
    env:
      - name: "BIND"
        value: ":8080"
      - name: "DIFFICULTY"
        value: "4"
      - name: ED25519_PRIVATE_KEY_HEX
        valueFrom:
          secretKeyRef:
            name: anubis-key
            key: ED25519_PRIVATE_KEY_HEX
      - name: "METRICS_BIND"
        value: ":9090"
      - name: "SERVE_ROBOTS_TXT"
        value: "true"
      - name: "TARGET"
        value: "http://localhost:5000"
      - name: "OG_PASSTHROUGH"
        value: "true"
      - name: "OG_EXPIRY_TIME"
        value: "24h"
    resources:
      limits:
        cpu: 750m
        memory: 256Mi
      requests:
        cpu: 250m
        memory: 256Mi
    securityContext:
      runAsUser: 1000
      runAsGroup: 1000
      runAsNonRoot: true
      allowPrivilegeEscalation: false
      capabilities:
        drop:
          - ALL
      seccompProfile:
        type: RuntimeDefault
然后为 Anubis 添加服务条目:
# ...
spec:
  ports:
    - protocol: TCP
      port: 8080
      targetPort: 8080
      name: anubis
然后将您的 Ingress 指向 Anubis 端口:
  rules:
  - host: git.xeserv.us
    http:
      paths:
      - pathType: Prefix
        path: "/"
        backend:
          service:
            name: git
            port:
              name: http
              name: anubis
Nginx
Anubis 是一个过滤代理。将其与nginx集成的方法是将配置分成两部分: TLS 终止和 HTTP 路由。请看下图:
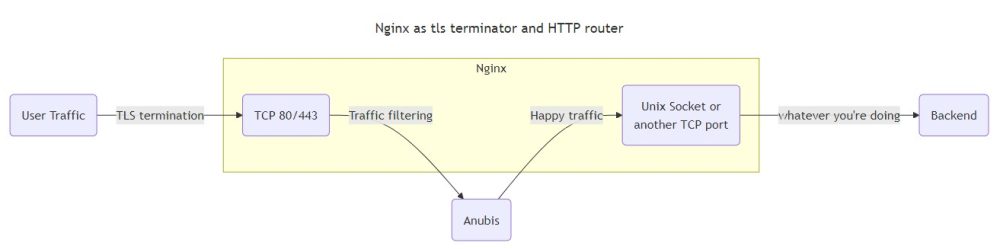
流量不会直接从 TLS 终端进入后台,而是绕道经过 Anubis。Anubis 会过滤掉 “坏 ”流量,然后将 “好 ”流量传递到 Nginx 打开的另一个套接字。最后这个套接字将用于执行 HTTP 路由。
实际上,nginx 有两个作用: TLS终止(将HTTPS转换为HTTP)和HTTP路由(将请求分发到各个虚拟主机)。如果你使用的是传统部署,这可以与 Apache 等堆叠使用。确保在 TLS 终止级别配置了正确的 TLS 证书。
注意
这些示例假设nginx配置由/etc/nginx/conf.d/*.conf中的大量文件组成。但并非所有nginx部署都是如此。如果你不在这样的环境中,请将这些代码段添加到/etc/nginx/nginx.conf文件中。
假设我们保护的是 anubistest.techaro.lol,下面是服务器配置文件的样子:
# /etc/nginx/conf.d/server-anubistest-techaro-lol.conf

# HTTP - Redirect all HTTP traffic to HTTPS
server {
  listen 80;
  listen [::]:80;

  server_name anubistest.techaro.lol;

  location / {
    return 301 https://$host$request_uri;
  }
}

# TLS termination server, this will listen over TLS (https) and then
# proxy all traffic to the target via Anubis.
server {
  # Listen on TCP port 443 with TLS (https) and HTTP/2
  listen 443 ssl http2;
  listen [::]:443 ssl http2;

  location / {
    proxy_set_header Host $host;
    proxy_set_header X-Real-IP $remote_addr;
    proxy_set_header X-Http-Version $server_protocol;
    proxy_pass http://anubis;
  }

  server_name anubistest.techaro.lol;

  ssl_certificate     /path/to/your/certs/anubistest.techaro.lol.crt;
  ssl_certificate_key /path/to/your/certs/anubistest.techaro.lol.key;
}

# Backend server, this is where your webapp should actually live.
server {
  listen unix:/run/nginx/nginx.sock;

  server_name anubistest.techaro.lol;
  root "/srv/http/anubistest.techaro.lol";
  index index.html;

  # Get the visiting IP from the TLS termination server
  set_real_ip_from unix:;
  real_ip_header   X-Real-IP;

  # Your normal configuration can go here
  # location .php { fastcgi...} etc.
}
提示
可以将 “location /”代码块复制到一个单独的文件中,命名为 “conf-anubis.inc”,然后将其内嵌到其他 “server ”代码块中:
# /etc/nginx/conf.d/conf-anubis.inc

# Forward to anubis
location / {
  proxy_set_header Host $host;
  proxy_set_header X-Real-IP $remote_addr;
  proxy_pass http://anubis;
}
然后在服务器块中
Full nginx config
为Anubis创建一个上游。
# /etc/nginx/conf.d/upstream-anubis.conf

upstream anubis {
  # Make sure this matches the values you set for `BIND` and `BIND_NETWORK`.
  # If this does not match, your services will not be protected by Anubis.

  # Try anubis first over a UNIX socket
  server unix:/run/anubis/nginx.sock;
  #server 127.0.0.1:8923;

  # Optional: fall back to serving the websites directly. This allows your
  # websites to be resilient against Anubis failing, at the risk of exposing
  # them to the raw internet without protection. This is a tradeoff and can
  # be worth it in some edge cases.
  #server unix:/run/nginx.sock backup;
}
可在多个站点重复此操作。Anubis不关心HTTP的 “Host ”头,会很乐意通过同一实例处理多个网站。
然后重新加载nginx配置并加载网站。你应该能看到 Anubis 在保护你的应用程序!
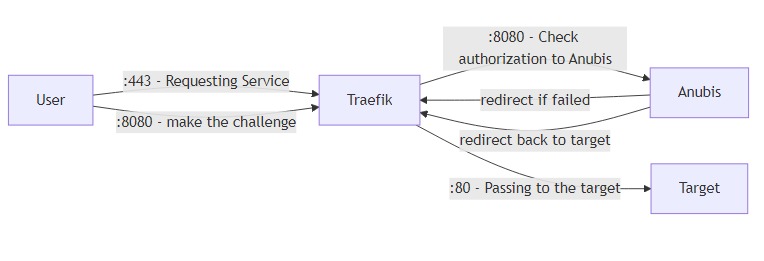
sudo systemctl reload nginx.service特拉菲克
注意
这里只讨论通过 Compose 进行的集成,但它也适用于 docker cli 选项。
在这个例子中,我们将使用 4 个容器:
traefik– 特拉菲克实例anubis– Anubis 实例target– 我们要保护的服务(本例中为traefik/whoami)- target2
--第二个不需要保护的服务(本例中为traefik/whoami`)
流程图
这是一个描述流程的小图。请记住,“8080 ”或 “80 ”可以是任何内容,这取决于您的容器。
完整示例配置
此示例包含 3 个服务:anubis,一个受保护,另一个不受保护。
compose.yml
services:
  traefik:
    image: traefik:v3.3
    ports:
      - 80:80
      - 443:443
    volumes:
      - /var/run/docker.sock:/var/run/docker.sock
      - ./letsencrypt:/letsencrypt
      - ./traefik.yml:/traefik.yml:ro
    networks:
      - traefik
    labels:
      # Enable Traefik
      - traefik.enable=true
      - traefik.docker.network=traefik
      # Anubis middleware
      - traefik.http.middlewares.anubis.forwardauth.address=http://anubis:8080/.within.website/x/cmd/anubis/api/check
      # Redirect any HTTP to HTTPS
      - traefik.http.middlewares.redirect-to-https.redirectscheme.scheme=https
      - traefik.http.routers.web.rule=PathPrefix(`/`)
      - traefik.http.routers.web.entrypoints=web
      - traefik.http.routers.web.middlewares=redirect-to-https
      - traefik.http.routers.web.tls=false

  anubis:
    image: ghcr.io/techarohq/anubis:main
    environment:
      # Telling Anubis, where to listen for Traefik
      - BIND=:8080
      # Telling Anubis to do redirect — ensure there is a space after '='
      - 'TARGET= '
      # Specifies which domains Anubis is allowed to redirect to.
      - REDIRECT_DOMAINS=example.com
      # Should be the full external URL for Anubis (including scheme)
      - PUBLIC_URL=https://anubis.example.com
      # Should match your domain for proper cookie scoping
      - COOKIE_DOMAIN=example.com
    networks:
      - traefik
    labels:
      - traefik.enable=true # Enabling Traefik
      - traefik.docker.network=traefik # Telling Traefik which network to use
      - traefik.http.routers.anubis.rule=Host(`anubis.example.com`) # Only Matching Requests for example.com
      - traefik.http.routers.anubis.entrypoints=websecure # Listen on HTTPS
      - traefik.http.services.anubis.loadbalancer.server.port=8080 # Telling Traefik where to receive requests
      - traefik.http.routers.anubis.service=anubis # Telling Traefik to use the above specified port
      - traefik.http.routers.anubis.tls.certresolver=le # Telling Traefik to resolve a Cert for Anubis

  # Protected by Anubis
  target:
    image: traefik/whoami:latest
    networks:
      - traefik
    labels:
      - traefik.enable=true # Enabling Traefik
      - traefik.docker.network=traefik # Telling Traefik which network to use
      - traefik.http.routers.target.rule=Host(`example.com`) # Only Matching Requests for example.com
      - traefik.http.routers.target.entrypoints=websecure # Listening on the exclusive Anubis Network
      - traefik.http.services.target.loadbalancer.server.port=80 # Telling Traefik where to receive requests
      - traefik.http.routers.target.service=target # Telling Traefik to use the above specified port
      - traefik.http.routers.target.tls.certresolver=le # Telling Traefik to resolve a Cert for Anubis
      - traefik.http.routers.target.middlewares=anubis@docker # Use the Anubis middleware

  # Not Protected by Anubis
  target2:
    image: traefik/whoami:latest
    networks:
      - traefik
    labels:
      - traefik.enable=true # Enabling Traefik
      - traefik.docker.network=traefik # Telling Traefik which network to use
      - traefik.http.routers.target2.rule=Host(`another.example.com`) # Only Matching Requests for example.com
      - traefik.http.routers.target2.entrypoints=websecure # Listening on the exclusive Anubis Network
      - traefik.http.services.target2.loadbalancer.server.port=80 # Telling Traefik where to receive requests
      - traefik.http.routers.target2.service=target2 # Telling Traefik to use the above specified port
      - traefik.http.routers.target2.tls.certresolver=le # Telling Traefik to resolve a Cert for this Target

networks:
  traefik:
    name: traefik
traefik.yml
api:
  insecure: false # shouldn't be enabled in prod

entryPoints:
  # Web
  web:
    address: ":80"
  websecure:
    address: ":443"

certificatesResolvers:
  le:
    acme:
      tlsChallenge: {}
      email: "admin@example.com"
      storage: "/letsencrypt/acme.json"

providers:
  docker: {}
框架
有关让特定框架或工具与 Anubis 协同工作的信息。
HTMX
HTMX是一个框架,可以让你使用超文本作为应用程序状态的引擎来编写应用程序。这样,您就可以通过让服务器返回 HTML 而不是 JSON 来简化服务器端代码。这会干扰 Anubis,因为 Anubis 挑战页面也会返回 HTML。
要解决这个问题,可以自定义expression规则,如果用户过去通过了挑战,则允许 HTMX 请求:
- name: allow-htmx-iff-already-passed-challenge
  action: ALLOW
  expression:
    all:
      - '"Cookie" in headers'
      - 'headers["Cookie"].contains("anubis-auth")'
      - '"Hx-Request" in headers'
      - 'headers["Hx-Request"] == "true"'
这样做会降低一些安全性,因为它无法断言 Anubis auth cookie 的有效性,但换句话说,它改善了现有用户的体验。
WordPress
WordPress 是全球最流行的博客引擎。
使用 Anubis 进行多站点设置
如果您有一个多站点设置,流量会像这样通过 Anubis:
WordPress 可能不会意识到底层连接是通过 HTTPS 进行的。这可能会导致 /wp-admin/路由出现重定向循环。为了解决这个问题,请在 wp-config.php 文件中添加以下内容:
if (isset($_SERVER['HTTP_X_FORWARDED_PROTO']) && $_SERVER['HTTP_X_FORWARDED_PROTO'] === 'https') {
    $_SERVER['HTTPS'] = 'on';
    $_SERVER['SERVER_PORT'] = 443;
}
这将使 WordPress 认为您的连接是通过 HTTPS 而不是普通 HTTP 进行的。
robots2policy CLI 工具
robots2policy “工具可将 robots.txt 文件转换为 Anubis 挑战策略。它读取 robots.txt 规则,并为路径匹配和用户代理过滤生成等效的 CEL 表达式。
安装
直接使用 Go 安装:
go install github.com/TecharoHQ/anubis/cmd/robots2policy@latest使用方法
从 URL 进行基本转换:
robots2policy -input https://www.example.com/robots.txt将本地文件转换为 YAML:
robots2policy -input robots.txt -output policy.yaml使用自定义设置进行转换:
robots2policy -input robots.txt -action DENY -format json选项
| Flag | Description | Default |
|---|---|---|
-input |
robots.txt file path or URL (use - for stdin) |
required |
-output |
Output file (use - for stdout) |
stdout |
-format |
Output format: yaml or json |
yaml |
-action |
Action for disallowed paths: ALLOW, DENY, CHALLENGE, WEIGH |
CHALLENGE |
-name |
Policy name prefix | robots-txt-policy |
-crawl-delay-weight |
Weight adjustment for crawl-delay rules | 3 |
-deny-user-agents |
Action for blacklisted user agents | DENY |
示例
输入 robots.txt:
User-agent: *
Disallow: /admin/
Disallow: /private

User-agent: BadBot
Disallow: /
生成策略:
- name: robots-txt-policy-disallow-1
  action: CHALLENGE
  expression:
    single: path.startsWith("/admin/")
- name: robots-txt-policy-disallow-2
  action: CHALLENGE
  expression:
    single: path.startsWith("/private")
- name: robots-txt-policy-blacklist-3
  action: DENY
  expression:
    single: userAgent.contains("BadBot")
使用生成的策略
保存输出结果,并将其导入主策略文件:
import:
  - path: "./robots-policy.yaml"
该工具可自动处理通配符模式、用户代理特定规则和黑名单僵尸。
默认允许行为
Anubis 的设计尽可能不干扰现有基础设施。
默认情况下,它允许所有流量,除非请求符合明确拒绝或质疑的规则。
只有符合 “拒绝 ”或 “挑战 ”规则的请求才会被阻止或挑战。所有其他请求都是允许的。这就是所谓的 “隐式规则”。
示例: 最小策略
如果您的策略只阻止特定的机器人,则允许所有其他请求:
JSON
{
  "bots": [
    {
      "name": "block-amazonbot",
      "user_agent_regex": "Amazonbot",
      "action": "DENY"
    }
  ]
}
YAML
- name: block-amazonbot
  user_agent_regex: Amazonbot
  action: DENY
如何默认拒绝
如果您想拒绝除您明确允许的流量之外的所有流量,请在策略列表末尾添加一条全面拒绝规则。请确保在此规则之前为您要允许的任何流量添加 ALLOW 规则。
JSON
{
  "bots": [
    {
      "name": "allow-goodbot",
      "user_agent_regex": "GoodBot",
      "action": "ALLOW"
    },
    {
      "name": "catch-all-deny",
      "path_regex": ".*",
      "action": "DENY"
    }
  ]
}
YAML
- name: allow-goodbot
  user_agent_regex: GoodBot
  action: ALLOW
- name: catch-all-deny
  path_regex: .*
  action: DENY
结束语
- 规则按顺序评估;先匹配者获胜。
- 隐式允许规则总是排在最后,且无法删除。
- 使用日志监控默认允许哪些流量。
有关编写规则的更多详情,请参阅策略定义。
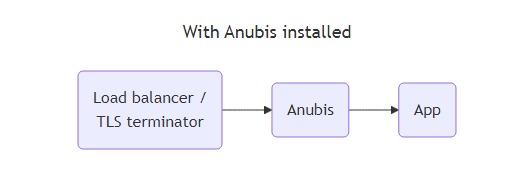
设置Anubis
Anubis 位于反向代理(如 Nginx 或 Caddy)和目标服务之间。每个受保护的服务必须使用一个 Anubis 实例。
Docker 镜像
Anubis 在 Docker repo ghcr.io/techarohq/anubis 中发布。为方便起见,存在以下标签:
| Tag | Meaning |
|---|---|
latest |
The latest tagged release, if you are in doubt, start here. |
v<version number> |
The Anubis image for any given tagged release |
main |
The current build on the main branch. Only use this if you need the latest and greatest features as they are merged into main. |
Docker 映像以用户 ID 1000 和组 ID 1000 的身份运行 Anubis。如果要将外部卷挂载到 Anubis 的容器中,请确保这些卷为该用户/组所有或可写。
Anubis 对系统的要求非常低。我认为 128Mi 内存对于大量并发客户端来说已经足够。Anubis 可能不太适合使用 WebSockets 并保持开放连接的应用程序,但我没有足够的实际经验来判断。
本地软件包
有关使用本地软件包安装 Anubis 的详细信息,请阅读本地安装说明。
配置
Anubis 可通过环境变量和策略文件进行配置。目前,大多数设置都是通过环境变量来实现的,但这些设置正在慢慢转移到策略文件中。
通过策略文件进行配置
目前可通过策略文件配置以下设置:
- 机器人策略
- Open Graph 直通
- 权重阈值
环境变量
Anubis 使用这些环境变量进行配置:
| Environment Variable | Default value | Explanation |
|---|---|---|
BASE_PREFIX |
unset | If set, adds a global prefix to all Anubis endpoints (everything starting with /.within.website/x/anubis/). For example, setting this to /myapp would make Anubis accessible at /myapp/ instead of /. This is useful when running Anubis behind a reverse proxy that routes based on path prefixes. |
BIND |
:8923 |
The network address that Anubis listens on. For unix, set this to a path: /run/anubis/instance.sock |
BIND_NETWORK |
tcp |
The address family that Anubis listens on. Accepts tcp, unix and anything Go’s net.Listen supports. |
COOKIE_DOMAIN |
unset | The domain the Anubis challenge pass cookie should be set to. This should be set to the domain you bought from your registrar (EG: techaro.lol if your webapp is running on anubis.techaro.lol). See this stackoverflow explanation of cookies for more information.
Note that unlike |
COOKIE_DYNAMIC_DOMAIN |
false | If set to true, automatically set cookie domain fields based on the hostname of the request. EG: if you are making a request to anubis.techaro.lol, the Anubis cookie will be valid for any subdomain of techaro.lol. |
COOKIE_EXPIRATION_TIME |
168h |
The amount of time the authorization cookie is valid for. |
COOKIE_PARTITIONED |
false |
If set to true, enables the partitioned (CHIPS) flag, meaning that Anubis inside an iframe has a different set of cookies than the domain hosting the iframe. |
COOKIE_PREFIX |
anubis-cookie |
The prefix used for browser cookies created by Anubis. Useful for customization or avoiding conflicts with other applications. |
COOKIE_SECURE |
true |
If set to true, enables the Secure flag, meaning that the cookies will only be transmitted over HTTPS. If Anubis is used in an unsecure context (plain HTTP), this will be need to be set to false |
DIFFICULTY |
4 |
The difficulty of the challenge, or the number of leading zeroes that must be in successful responses. |
ED25519_PRIVATE_KEY_HEX |
unset | The hex-encoded ed25519 private key used to sign Anubis responses. If this is not set, Anubis will generate one for you. This should be exactly 64 characters long. When running multiple instances on the same base domain, the key must be the same across all instances. See below for details. |
ED25519_PRIVATE_KEY_HEX_FILE |
unset | Path to a file containing the hex-encoded ed25519 private key. Only one of this or its sister option may be set. |
JWT_RESTRICTION_HEADER |
X-Real-IP |
If set, the JWT is only valid if the current value of this header matches the value when the JWT was created. You can use it e.g. to restrict a JWT to the source IP of the user using X-Real-IP. |
METRICS_BIND |
:9090 |
The network address that Anubis serves Prometheus metrics on. See BIND for more information. |
METRICS_BIND_NETWORK |
tcp |
The address family that the Anubis metrics server listens on. See BIND_NETWORK for more information. |
OG_EXPIRY_TIME |
24h |
The expiration time for the Open Graph tag cache. Prefer using the policy file to configure the Open Graph subsystem. |
OG_PASSTHROUGH |
false |
If set to true, Anubis will enable Open Graph tag passthrough. Prefer using the policy file to configure the Open Graph subsystem. |
OG_CACHE_CONSIDER_HOST |
false |
If set to true, Anubis will consider the host in the Open Graph tag cache key. Prefer using the policy file to configure the Open Graph subsystem. |
POLICY_FNAME |
unset | The file containing bot policy configuration. See the bot policy documentation for more details. If unset, the default bot policy configuration is used. |
PUBLIC_URL |
unset | The externally accessible URL for this Anubis instance, used for constructing redirect URLs (e.g., for Traefik forwardAuth). |
REDIRECT_DOMAINS |
unset | If set, restrict the domains that Anubis can redirect to when passing a challenge.
If this is unset, Anubis may redirect to any domain which could cause security issues in the unlikely case that an attacker passes a challenge for your browser and then tricks you into clicking a link to your domain. Note that if you are hosting Anubis on a non-standard port ( |
SERVE_ROBOTS_TXT |
false |
If set true, Anubis will serve a default robots.txt file that disallows all known AI scrapers by name and then additionally disallows every scraper. This is useful if facts and circumstances make it difficult to change the underlying service to serve such a robots.txt file. |
SLOG_LEVEL |
INFO |
The log level for structured logging. Valid values are DEBUG, INFO, WARN, and ERROR. Set to DEBUG to see all requests, evaluations, and detailed diagnostic information. |
SOCKET_MODE |
0770 |
Only used when at least one of the *_BIND_NETWORK variables are set to unix. The socket mode (permissions) for Unix domain sockets. |
STRIP_BASE_PREFIX |
false |
If set to true, strips the base prefix from request paths when forwarding to the target server. This is useful when your target service expects to receive requests without the base prefix. For example, with BASE_PREFIX=/foo and STRIP_BASE_PREFIX=true, a request to /foo/bar would be forwarded to the target as /bar. |
TARGET |
http://localhost:3923 |
The URL of the service that Anubis should forward valid requests to. Supports Unix domain sockets, set this to a URI like so: unix:///path/to/socket.sock. |
USE_REMOTE_ADDRESS |
unset | If set to true, Anubis will take the client’s IP from the network socket. For production deployments, it is expected that a reverse proxy is used in front of Anubis, which pass the IP using headers, instead. |
USE_SIMPLIFIED_EXPLANATION |
false | If set to true, replaces the text when clicking “Why am I seeing this?” with a more simplified text for a non-tech-savvy audience. |
WEBMASTER_EMAIL |
unset | If set, shows a contact email address when rendering error pages. This email address will be how users can get in contact with administrators. |
XFF_STRIP_PRIVATE |
true |
If set, strip private addresses from X-Forwarded-For headers. To unset this, you must set XFF_STRIP_PRIVATE=false or --xff-strip-private=false. |
高级配置设置
有关配置 Open Graph 标签的详细信息,请参阅 Open Graph Configuration 页面。
使用基本前缀
通过 BASE_PREFIX 环境变量,可以在路径前缀后面运行 Anubis。这在以下情况下非常有用
- 想在同一域名上托管多个服务
- 使用基于路径前缀路由的反向代理
- 需要将Anubis与现有应用程序结构整合
例如,如果设置 “BASE_PREFIX=/myapp”,Anubis将
- 在
/myapp/而不是/服务其挑战页面 - 在
/myapp/.within.website/x/cmd/anubis/api/而不是/.within.website/x/cmd/anubis/api/服务其 API 端点 - 在
/myapp/.within.website/x/cmd/anubis/而不是/.within.website/x/cmd/anubis/服务静态资产。
与反向代理一起使用此功能时
- 配置反向代理,将指定路径前缀的请求路由到 Anubis
- 设置
BASE_PREFIX环境变量,以匹配反向代理配置中的路径前缀 - 确保反向代理在将请求转发至 Anubis 时保留路径
使用 Nginx 的示例:
location /myapp/ {
    proxy_pass http://anubis:8923/myapp;
    proxy_set_header Host $host;
    proxy_set_header X-Real-IP $remote_addr;
}
相应的 Anubis 配置
BASE_PREFIX=/myapp
删除基本前缀
如果目标服务不希望在请求路径中接收基本前缀,可以使用 STRIP_BASE_PREFIX 选项:
BASE_PREFIX=/myapp
STRIP_BASE_PREFIX=true
使用此配置:
- 向
/myapp/api/users提出的请求将以/api/users的形式转发给目标服务。 - 对
/myapp/的请求将被转发为/
这在处理设计时未处理路径前缀的应用程序时特别有用。但请注意,如果您的目标应用程序生成绝对重定向或链接(如 /login 而不是 ./login),这些可能会破坏子路径路由,因为它们不会包含基本前缀。
密钥生成
要生成 ed25519 私钥,可以使用此命令:
openssl rand -hex 32
以下是浏览器生成的密钥:
e48dcb06e36447aa263fefdbbb3a7d245cb1164a4697b98e9922adffe0b023de♻️
下一步
要让 Anubis 过滤流量,需要确保将其添加到 HTTP 负载均衡器或平台配置中。有关各个环境的详细信息,请参阅环境类别。
注意
Anubis 从 /.internal.website/x/xess/和 /.internal.website/x/cmd/anubis加载其资产。如果不在服务器配置中反向代理这些内容,Anubis 将无法运行。
使用本地软件包安装 Anubis
从GitHub 上的最新版本下载适用于你系统的软件包。
使用你选择的软件包管理器安装 Anubis 软件包:
基于宿主系统 (apt)
使用 apt 安装 Anubis:
sudo apt install ./anubis-$VERSION-$ARCH.deb安装完成后,根据要保护的服务复制默认配置文件 /etc/anubis/default.env。例如,保护 gitea 服务器:
sudo cp /etc/anubis/default.env /etc/anubis/gitea.env将默认僵尸策略文件复制到 /etc/anubis/gitea.botPolicies.yaml:
压缩包
将压缩包解压到一个文件夹:
tar zxf ./anubis-$VERSION-$OS-$ARCH.tar.gz
cd anubis-$VERSION-$OS-$ARCH
将二进制文件安装到系统中:
sudo install -D ./bin/anubis /usr/local/bin编辑 systemd 单元以指向 /usr/local/bin/anubis,而不是 /usr/bin/anubis:
perl -pi -e 's$/usr/bin/anubis$/usr/local/bin/anubis$g' ./run/anubis@.service将 systemd 单元安装到系统中:
sudo install -D ./run/anubis@.service /etc/systemd/system在系统中安装默认配置文件:
sudo install -D ./run/default.env /etc/anubis/default.env安装完成后,根据要保护的服务复制默认配置文件 /etc/anubis/default.env。例如,保护 gitea 服务器:
sudo cp /etc/anubis/default.env /etc/anubis/gitea.env将默认僵尸策略文件复制到 /etc/anubis/gitea.botPolicies.yaml:
基于 Red Hat (rpm)
使用 dnf 安装 Anubis:
sudo dnf -y install ./anubis-$VERSION.$ARCH.rpm或
使用 yum 安装 Anubis:
sudo yum -y install ./anubis-$VERSION.$ARCH.rpm或
使用 rpm 安装 Anubis:
sudo rpm -ivh ./anubis-$VERSION.$ARCH.rpm安装完成后,根据要保护的服务复制默认配置文件 /etc/anubis/default.env。例如,保护 gitea 服务器:
sudo cp /etc/anubis/default.env /etc/anubis/gitea.env将默认僵尸策略文件复制到 /etc/anubis/gitea.botPolicies.yaml:
软件包管理器
一些 Linux 发行版提供 Anubis 作为本地软件包。如果你想通过发行版的软件包管理器安装 Anubis,请查阅上游文档了解如何安装该软件包。它将被命名为 “anubis”、“www-apps/anubis ”或 “www/anubis”。
如果你使用的是 systemd 版本,请按照 Debian 或 Red Hat Linux 的安装说明进行安装。
安装完成后,根据要保护的服务复制默认配置文件 /etc/anubis/default.env。例如,保护 gitea 服务器:
sudo cp /etc/anubis/default.env /etc/anubis/gitea.env将默认僵尸策略文件复制到 /etc/anubis/gitea.botPolicies.yaml:
Debian或Red Hat
sudo cp /usr/share/doc/anubis/botPolicies.yaml /etc/anubis/gitea.botPolicies.yaml
tarball
sudo cp /usr/share/doc/anubis/botPolicies.yaml /etc/anubis/gitea.botPolicies.yaml
然后用你喜欢的文本编辑器打开 gitea.env,并根据需要自定义 环境变量。以下是 Gitea 服务器的配置示例:
BIND=[::1]:8239
BIND_NETWORK=tcp
DIFFICULTY=4
METRICS_BIND=[::1]:8240
METRICS_BIND_NETWORK=tcp
POLICY_FNAME=/etc/anubis/gitea.botPolicies.yaml
TARGET=http://localhost:3000
然后使用 systemctl enable --now 启动 Anubis:
sudo systemctl enable --now anubis@gitea.service使用 curl 测试以确保它正在运行:
curl http://localhost:8240/metrics然后设置反向代理(Nginx、Caddy 等)指向 Anubis 端口。然后,Anubis 会将符合 /etc/anubis/gitea.botPolicies.yaml 中策略的所有请求反向代理到目标服务。
有关特定反向代理的更多详情,请参阅此处:
策略定义
开箱即用的 Anubis 非常严厉。它会主动挑战所有可能是浏览器的内容(通常用户代理中包含 Mozilla)。不过,有些机器人很聪明,可以躲过挑战。有些看起来像机器人的东西实际上可能是好的(IE:RSS 阅读器)。有些资源无论如何都需要可见。有些资源和远程资源一开始就很好。
Anubis 允许你使用策略文件自定义配置。这是一个 YAML 文件,其中说明了 Anubis 在评估请求时应采取的行动。默认配置 解释了一切,但本页包含了你可以用它做的所有事情的概览。
Bot Policies
机器人策略可以让你自定义 Anubis 用来允许、拒绝或质疑传入请求的规则。目前,你可以通过以下匹配设置策略:
- 请求路径
- 用户代理字符串
- HTTP 请求头值
- 导入其他配置片段
从 v1.17.0 或更高版本开始,配置可以用 JSON 或 YAML 编写。
下面是一个拒绝 Amazonbot 的规则示例:
- name: amazonbot
  user_agent_regex: Amazonbot
  action: DENY
评估该规则时,Anubis 会检查请求的 “用户代理 ”字符串。如果字符串中包含 “Amazonbot”,Anubis 就会向用户发送一个错误页面,说明拒绝访问,但会让网络爬虫者认为他们已经正确加载了网页。
现在,你能编写的策略只有僵尸策略。将来还会添加其他形式的策略。
下面是一个最低限度的策略文件,可以防止大多数网络爬虫机器人:
bots:
  - name: cloudflare-workers
    headers_regex:
      CF-Worker: .*
    action: DENY
  - name: well-known
    path_regex: ^/.well-known/.*$
    action: ALLOW
  - name: favicon
    path_regex: ^/favicon.ico$
    action: ALLOW
  - name: robots-txt
    path_regex: ^/robots.txt$
    action: ALLOW
  - name: generic-browser
    user_agent_regex: Mozilla
    action: CHALLENGE
这允许向 /.well-known、/favicon.ico、/robots.txt 提出请求,并对用户代理字符串中包含Mozilla一词的任何请求提出挑战。默认策略文件 更具凝聚力,但对大多数用户来说应该绰绰有余。
如果没有规则匹配请求,则允许通过。有关此默认行为及其影响的更多详情,请参阅默认允许行为。
编写自己的规则
规则可以返回四种操作:
| Action | Effects |
|---|---|
ALLOW |
Bypass all further checks and send the request to the backend. |
DENY |
Deny the request and send back an error message that scrapers think is a success. |
CHALLENGE |
Show a challenge page and/or validate that clients have passed a challenge. |
WEIGH |
Change the request weight for this request. See the request weight docs for more information. |
使用 kebab-case 小写字母为规则命名。规则名称将显示在 Prometheus 指标中。
挑战配置
规则也可以有自己的挑战设置。这些设置可使用“challenge”键自定义。例如,这里的规则会人为地增加用户代理中包含 “bot ”子字符串的连接的挑战难度:
该规则在测试中的误报率较高。请谨慎使用。
# Punish any bot with "bot" in the user-agent string
- name: generic-bot-catchall
  user_agent_regex: (?i:bot|crawler)
  action: CHALLENGE
  challenge:
    difficulty: 16 # impossible
    report_as: 4 # lie to the operator
    algorithm: slow # intentionally waste CPU cycles and time
可以使用这些设置配置挑战:
| Key | Example | Description |
|---|---|---|
difficulty |
4 |
The challenge difficulty (number of leading zeros) for proof-of-work. See Why does Anubis use Proof-of-Work? for more details. |
report_as |
4 |
What difficulty the UI should report to the user. Useful for messing with industrial-scale scraping efforts. |
algorithm |
"fast" |
The challenge method to use. See the list of challenge methods for more information. |
基于远程 IP 的过滤
Bot 规则的 “remote_addresses ”字段允许您设置该规则集适用的 IP 范围。
例如,您可以允许搜索引擎在其 IP 地址与其发布的地址相匹配的情况下进行连接:
- name: qwantbot
  user_agent_regex: \+https\://help\.qwant\.com/bot/
  action: ALLOW
  # https://help.qwant.com/wp-content/uploads/sites/2/2025/01/qwantbot.json
  remote_addresses: ["91.242.162.0/24"]
这也适用于 IP 范围级别,无需任何其他检查:
name: internal-network
action: ALLOW
remote_addresses:
  - 100.64.0.0/10
Imprint / Impressum 支持
Anubis 支持显示 Imprint / Impressum 信息。这在配置的 impressum 块中定义。更多信息请参阅Imprint / Impressum 配置。
存储后端
Anubis 需要存储临时数据,以确定用户是否合法。管理员应根据自己的基础设施需求选择存储后端。每个后端都有自己的优缺点。
Anubis 提供以下存储后端:
memory– 一个简单的内存哈希表bbolt– 由 bbolt支持的磁盘上的键/值存储,这是 Go 程序的嵌入式键/值数据库valkey– 由Valkey(或与RESP 协议兼容的其他数据库)支持的远程内存键/值数据库
如果策略文件中没有设置存储后端,Anubis 默认使用memory 后端。这等同于策略文件中的以下内容:
store:
  backend: memory
  parameters: {}
memory
内存后端是一个内存缓存。如果不使用多个 Anubis 实例,或在运行 Anubis 的环境中没有可变存储,则使用该后端效果最佳。
| Should I use this backend? | Yes/no |
|---|---|
| Are you running only one instance of Anubis for this service? | ✅ Yes |
| Does your service get a lot of traffic? | 🚫 No |
| Do you want to store data persistently when Anubis restarts? | 🚫 No |
| Do you run Anubis without mutable filesystem storage? | ✅ Yes |
最大的缺点是目前对内存中可存储的数据量没有限制。这个问题将在以后解决。
警告
内存后端主要用于验证、测试,并确保 Anubis 的默认配置按预期运行。请勿在生产中持续使用。
配置
内存后端无需任何配置即可使用。
bbolt
由 bbolt驱动的磁盘存储层,这是一个高性能嵌入式键/值数据库,由 containerd、etcd、Kubernetes 和 NATS 使用。如果在单台主机上运行 Anubis 且流量很大,则使用该后端效果最佳。
| Should I use this backend? | Yes/no |
|---|---|
| Are you running only one instance of Anubis for this service? | ✅ Yes |
| Does your service get a lot of traffic? | ✅ Yes |
| Do you want to store data persistently when Anubis restarts? | ✅ Yes |
| Do you run Anubis without mutable filesystem storage? | 🚫 No |
当 Anubis 打开一个 bbolt 数据库时,它会对该数据库进行排他性锁定。当 bbolt 数据库被另一个 Anubis 实例锁定时,其他 Anubis 实例或其他工具无法查看该数据库。如果为不同的服务运行多个 Anubis 实例,请为每个实例配置自己的 bbolt 配置。
配置
bbolt 后端需要以下配置选项:
| Name | Type | Example | Description |
|---|---|---|---|
path |
path | /data/anubis.bdb |
The filesystem path for the Anubis bbolt database. Anubis requires write access to the folder containing the bbolt database. |
示例:
如果您将持久存储挂载到 /data,那么您的存储配置可以如下所示:
store:
  backend: bbolt
  parameters:
    path: /data/anubis.bdb
valkey
Valkey 是一个内存密钥/值存储空间,客户可通过网络访问。这允许多个 Anubis 实例共享信息,且不要求每个 Anubis 实例都拥有持久的文件系统存储。
注意
你也可以在 Anubis 中使用 Redis。
如果你在一个 Worker 池中运行多个 Anubis 实例(例如:在每个 Pod 中都有一个 Anubis 副本的 Kubernetes 部署),这个后端是理想之选。
| Should I use this backend? | Yes/no |
|---|---|
| Are you running only one instance of Anubis for this service? | 🚫 No |
| Does your service get a lot of traffic? | ✅ Yes |
| Do you want to store data persistently when Anubis restarts? | ✅ Yes |
| Do you run Anubis without mutable filesystem storage? | ✅ Yes |
| Do you have Redis or Valkey installed? | ✅ Yes |
配置
valkey “后端需要以下配置选项:
| Name | Type | Example | Description |
|---|---|---|---|
url |
string | redis://valkey:6379/0 |
The URL for the instance of Redis or Valkey that Anubis should store data in. This is in the same format as REDIS_URL in many cloud providers. |
举例说明:
如果您运行的 Valkey 实例的主机名为 valkey.int.techaro.lol,那么您的商店配置可能如下:
store:
  backend: valkey
  parameters:
    url: "redis://valkey.int.techaro.lol:6379/0"
这将使 Valkey 客户端连接到端口为 6379 的主机 valkey.int.techaro.lol 和数据库 0(默认数据库)。
下游服务的风险计算
如果您的服务因风险计算原因而需要它,Anubis 会使用一些标头公开与任何请求匹配的规则相关的信息:
| Header | Explanation | Example |
|---|---|---|
X-Anubis-Rule |
The name of the rule that was matched | bot/lightpanda |
X-Anubis-Action |
The action that Anubis took in response to that rule | CHALLENGE |
X-Anubis-Status |
The status and how strict Anubis was in its checks | PASS |
策略规则使用Go 标准库正则表达式包进行匹配。你可以在regex101.com上随意修改语法,确保选择 Golang 选项。
请求权重
Anubis 规则还可以添加或删除请求的 “权重”,从而允许管理员配置自定义的可疑程度。例如,如果您的应用程序使用名为 “i_love_gitea ”的会话令牌:
- name: gitea-session-token
  action: WEIGH
  expression:
    all:
      - '"Cookie" in headers'
      - headers["Cookie"].contains("i_love_gitea=")
  # Remove 5 weight points
  weight:
    adjust: -5
这将从请求中移除五个权重点,从而使 Anubis 在默认配置中提出元刷新挑战。
权重阈值
有关配置权重阈值的更多信息,请参阅权重阈值配置
建议
权重仍是一个新功能,需要进一步完善。这是一项试验性功能,应将其视为试验性功能。以下是一些建议,可帮助您更好地调整请求:
- 浏览器类客户端的默认权重为 10。这将引发一个激烈的挑战。
- 以 5 的倍数移除和添加权重。
- 谨慎配置权重。
基于 Thoth 的高级检查
状态: 测试版
Anubis实例通常是孤立的。每个Anubis实例都有自己的配置,大致存在于自己的世界中,请求之间没有任何长期记忆。随着威胁、变通方法和人工智能网络爬虫工具链的发展,管理员需要一种比 Anubis 发布周期更快的方式来获取最新信息。
因此,Thoth 应运而生。Thoth 是 Anubis 的声誉数据库。Thoth 将信息反馈给 Anubis,以便它能更好地判断哪些流量是无害的,哪些流量是可疑的。
注释
Thoth 由 Techaro 托管。Thoth 是付费服务。Thoth 是选择性服务,需要人工干预(包括付费)才能使用。为 Thoth 提供动力的代码目前是闭源的。
要访问 Thoth,请在 GitHub 赞助商 和给 Xe 发送电子邮件 订阅。这将很快成为自助服务。
##实现
Thoth 是一项通过 gRPC 监听的网络服务。Thoth 的 API 在 GitHub 仓库 TecharoHQ/thoth-proto 的协议缓冲区定义中有所说明。
Thoth旨在提供_信息_,而非_权威_。Thoth 不能也不会任意阻止请求、来源或其他流量。Thoth 的作用是通知 Anubis 并影响请求的权重,从而保护上游资源。此外,Anubis会积极缓存来自 Thoth 的数据,这样随着时间的推移,Anubis就不需要经常请求数据了。这使得重复访问者的快速通道变得更快,并减少了 Thoth 所接触的数据量。
Thoth 功能
Thoth 目前正在积极开发中。目前,Thoth 为 Anubis 提供了以下功能:
- 基于 BGP 自治系统(ASN)的过滤功能
- 基于 GeoIP 位置的过滤
基于 ASN 的过滤
当公司将其主干基础设施连接到互联网时,是通过一个BGP 自治系统来实现的,该系统由一个数字(自治系统编号或 ASN)表示。互联网上的每个 IP 地址都归一个 ASN 所有,该 ASN 具有 1:1 查询功能,且不会频繁更改。
Anubis 使用 Thoth 将 IP 地址与 BGP 自治系统相匹配,这样就可以向个别互联网服务提供商(如 Cloudflare 或华为云)发出任意挑战,或者在管理员的明确指示下完全阻止它们。例如,下面是如何为来自 Cloudflare、华为云和阿里云的请求添加 10 个权重点:
- name: aggressive-asns-without-functional-abuse-contact
  action: WEIGH
  asns:
    match:
      - 13335 # Cloudflare
      - 136907 # Huawei Cloud
      - 45102 # Alibaba Cloud
  weight:
    adjust: 10
您可以在 bgp.tools 上查看 AS13335 或任何其他顶级违规者的详细信息。
基于 GeoIP 的过滤
在极端情况下,管理员可能不得不对整个国家采取行动。这种情况并不理想,但有时现实逼得他们不得不这样做,而管理员只想晚上睡个安稳觉。
Anubis使用 Thoth 查找 IP 地址注册的地理位置。这种查询方法并不是最好的,随着时间的推移会越来越好,但你可以把能用的都用上,这样下次就能做得更好。
例如,为来自巴西和中国的请求增加 10 个权重点:
- name: countries-with-aggressive-scrapers
  action: WEIGH
  geoip:
    countries:
      - BR
      - CN
  weight:
    adjust: 10
谨慎使用。
进展中的功能
这部分有点理想化,是 Thoth 的最终目标,而不是你现在就可以使用的东西。
总的来说,Thoth 的很多功能都是为了让你所熟悉和喜爱的Anubis变得更好、更智能、更不偏执。这些功能包括
- 针对高级模式、当前已知漏洞和其他出于操作安全原因需要保密的识别策略的私有规则集
- 通过 WebAssembly 实现私人挑战,包括高级浏览器检测逻辑
- 声誉查询使 Thoth 可以根据净总通过率任意影响请求的权重,从而使最常见的浏览器可以在不发出任何挑战的情况下通过。
- 为受信任的管理员提供应用程序接口,以报告滥用请求指纹,从而使 Anubis 能够在威胁演变时做出反应
- Anubis 定期报告每个 ASN 和其他指纹的通过率,以便改进方法。

你也许感兴趣的:
- 对抗网络爬虫,你不需要 Anubis
- 在 FreeBSD 上配置 Anubis 反 AI 爬虫工具
- 部署 Anubis:让 AI 网络爬虫寸步难行
- Apache 中的 Anubis 实现真的需要3个虚拟主机吗?
- Anubis:利用工作量证明(Proof-of-Work, PoW)机制来阻止 AI 网站爬虫
- Cloudflare 推出对人工智能数据抓取工具的默认阻断功能
- Cloudflare 将推出按爬取次数付费的 AI 爬虫服务
- 用一个奇招检测并让Chromium机器人爬虫崩溃(机器人爬虫讨厌这个!)
- 关于 JavaScript “工作证明(proof of work) “防抓取系统的思考
- 我用 Zip 炸弹保护我的服务器

Gặp nhau cuối năm was created in 2003.